
You’ve poured so much care into your garden, creating a living work of art. But even a masterpiece can look messy without a frame. When your lawn creeps into flowerbeds or mulch escapes onto the path, it’s time for a simple fix. A garden fence border provides that clean, finishing touch. It creates crisp lines that contain your design and make the colors of your flowers truly pop. This is the secret to turning a simple collection of plants into a polished, professional-looking garden, clearly defining where the lawn ends and your creation begins.
Key Takeaways
- Think function first, then form: A garden border does more than look pretty—it protects your soil, defines your space, and deters pests. Understanding its practical benefits will help you choose a style that truly works for your yard.
- Choose a material that fits your life: Consider your climate, aesthetic, and how much time you want to spend on upkeep. Durable, low-maintenance options like composite give you a polished look for years without the extra work.
- A solid foundation makes all the difference: Proper ground preparation is the most critical step for a stable, professional-looking border. Once it's installed correctly, you can focus on the fun part—personalizing it with plants, lighting, and unique accents.
What Can a Garden Border Do for You?
If you think a garden border is just a decorative final touch, think again. A well-chosen border is one of the hardest-working elements in your landscape. It’s the secret to a garden that not only looks polished and intentional but is also healthier and easier to manage. A border fence acts as a gentle guard for your plants, a frame for your floral masterpiece, and a clear map for your outdoor space. It’s a simple addition that solves some of the most common gardening frustrations, from wandering pets to invading weeds. Let’s look at exactly why your garden will thank you for adding a border.
Keep Your Plants and Soil Safe
One of the most practical jobs of a garden border is to create a protective barrier. It keeps precious topsoil and mulch from washing away during heavy rain or spilling onto your lawn every time you water. This means your plant roots stay covered and the nutrients you’ve worked into the soil stay right where they’re needed. A border also creates a clear visual cue that helps prevent accidental trampling from kids, pets, or even your own two feet. Think of it as a polite "please watch your step" sign for your delicate seedlings and blooming flowers. Using sturdy landscape edging is a simple way to establish these essential boundaries.
Create a Polished, Finished Look
A garden border is like the frame on a beautiful painting—it defines the space and makes the contents pop. The material and style you choose can completely transform the feel of your garden, turning it into a true focal point of your yard. Whether you prefer the clean, modern lines of metal or the timeless charm of a classic picket fence, the border sets the tone. It’s your chance to inject personality and create a cohesive look that ties your garden to the rest of your home’s aesthetic. A well-defined border gives your garden a finished, professional look that shows off all your hard work.
Bring Clean Lines to Your Landscape
Borders bring a sense of order to your landscape by creating distinct zones. They clearly separate your garden beds from your lawn, pathways, and patio, which makes everything feel neater and more intentional. This separation is also great for maintenance, as it helps keep grass and weeds from creeping into your flowerbeds. If you have a larger garden, you can use borders to create smaller, manageable sections for different types of plants, like an herb garden next to your vegetable patch. Using garden builder kits can help you design a layout that’s perfectly organized for your space and needs.
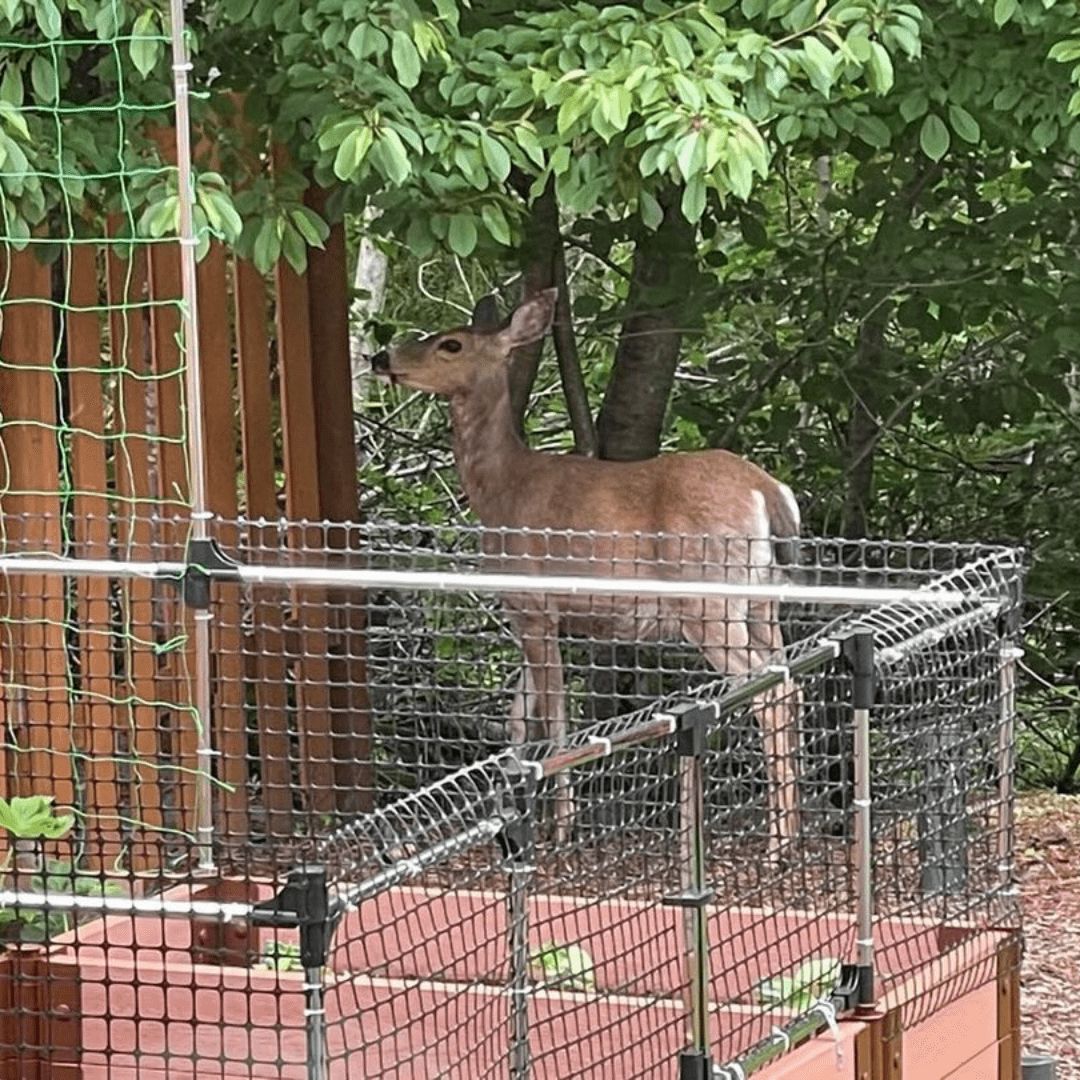
Keep Critters Out of Your Garden
Are you tired of finding your prize-winning petunias nibbled on by neighborhood rabbits? A border fence can be your first line of defense against common garden pests. Even a low border can be enough to deter small critters from wandering into your garden for a snack. It creates a physical obstacle that makes them think twice before helping themselves to your leafy greens. For more persistent pests, taller animal barrier gardens provide an even more effective solution, protecting your harvest without you having to stand guard all day. It’s a simple, humane way to keep your plants safe and sound.
Finding the Perfect Garden Border Material
Choosing the right material for your garden border is about more than just looks—it’s about finding the perfect balance of style, durability, and maintenance for your space. The material you pick sets the tone for your entire garden, whether you’re aiming for a charming cottage feel, a sleek modern design, or something in between. From the timeless appeal of wood to the lasting strength of composite, each option offers unique benefits. Let's walk through some of the most popular materials and styles to help you find the one that fits your garden and your lifestyle.
The Timeless Charm of Picket Fences
There’s a reason picket fences are a classic—they bring an undeniable charm to any garden. This style is perfect for creating a quaint, cottage-like atmosphere or adding a touch of tradition to your landscape. Picket fences are great for defining boundaries without completely obstructing the view, allowing your beautiful plants to remain the star of the show. While traditionally made of wood, you can now find them in low-maintenance materials that give you the classic look without the upkeep. These timeless designs work well for front yards, vegetable patches, and flower beds, offering a friendly and welcoming border.
Sleek and Modern Metal Edging
If you’re looking to add a touch of sophistication to your garden, metal is an excellent choice. Materials like wrought iron or powder-coated steel offer strength and elegance, with intricate designs that can turn a simple border into a statement piece. Metal fencing is incredibly durable and can create a formal, polished look that complements traditional and contemporary gardens alike. It’s perfect for framing a rose garden or creating a stately entrance to a pathway. For a modern and sturdy garden structure, you can also incorporate metal garden beds that coordinate with your elegant border.
Composite: The Low-Maintenance Powerhouse
For a border that’s built to last with minimal fuss, composite materials are a fantastic solution. Made from a blend of recycled plastic and wood fibers, composite boards won’t rot, warp, or splinter like traditional wood. This means you get the beautiful look of wood without the constant need for staining or sealing. Composite landscape edging is also incredibly easy to install, often featuring a simple snap-lock system that you can set up in an afternoon. It’s a practical, long-lasting choice for any gardener who wants to spend more time enjoying their plants and less time on maintenance.
Why Composite Works So Well
If you love the classic look of wood but dread the thought of sanding, staining, and sealing, composite material is your new best friend. It offers the best of both worlds by combining recycled plastic and wood fibers to create a border that’s as beautiful as it is tough. Unlike traditional wood, composite boards are engineered to withstand the elements, so they won’t rot, warp, or splinter over time. This means your garden border will maintain its clean, polished look for years without demanding constant upkeep, giving you a durable frame that lets your plants be the center of attention.
Frame It All’s Sustainable Composite
We take the benefits of composite a step further by focusing on sustainability and ease of use. Our composite boards are made with sustainably sourced wood fiber and recycled plastic, so you can feel good about the materials you’re bringing into your garden. Plus, our innovative snap-lock system makes installation a breeze—no special tools or expertise required. You can assemble a beautiful, sturdy border in a single afternoon. It’s a practical, long-lasting choice that lets you spend more time enjoying your garden and less time on maintenance. Our garden builder kits make it simple to design the perfect layout for your space.
Natural Borders: Hedges and Stones
Why not let nature define its own edges? A living border made of plants can create a soft, organic look that blends seamlessly with the rest of your garden. Low-growing shrubs like boxwood, flowering perennials, or even a neat row of ornamental grasses can form a beautiful and functional boundary. You can also use natural materials like woven willow or bamboo for a rustic feel. These creative border ideas are perfect for gardeners who prefer a less structured design and want to add more greenery and texture to their landscape.
Vinyl Fencing: Easy and Enduring
If your top priority is a border that looks great without requiring a lot of work, vinyl is a strong contender. Vinyl fencing is a true set-it-and-forget-it option. It resists moisture, won't rot or peel, and never needs painting—a simple rinse with a hose is usually all it takes to keep it clean. It comes in a wide variety of styles, from classic picket to solid privacy panels, so you don’t have to sacrifice aesthetics for convenience. A low garden fence made of vinyl can protect your flower beds while maintaining a crisp, clean look for years to come.
Decorative Wrought Iron
For a touch of timeless elegance, decorative wrought iron is a beautiful choice. It brings a sense of classic European charm to your garden, with intricate scrolls and sturdy lines that create a sophisticated frame for your plants. Because of its open design, it defines the garden bed without creating a heavy visual barrier, making it perfect for smaller spaces where you want to maintain a sense of openness. Wrought iron is more than just a pretty face; it's incredibly strong and built to last. Unlike wood, it won’t rot or warp over time. Many wrought iron garden edging options are handmade, offering a level of quality and craftsmanship that can endure for generations, making it a true investment in your landscape’s beauty.
Bamboo and Wood Options
If you’re aiming for a more natural or rustic look, bamboo and wood are excellent materials for your garden border. Wood, especially in a classic picket style, offers a traditional, welcoming feel that complements cottage and country gardens perfectly. Bamboo, on the other hand, can provide a more zen or tropical vibe, and it’s often sold in flexible rolls that are easy to install around curved beds. Both materials blend beautifully with the surrounding plants and landscape. While wood requires regular maintenance like staining or sealing to prevent rot, its natural charm is hard to beat. There is a wide variety of styles available to help you divide and define your outdoor spaces with an organic touch.
Go Green with Eco-Friendly Choices
Gardening is all about connecting with nature, so it makes sense to choose a border that’s kind to the planet. Eco-friendly options are becoming more popular and accessible. Look for materials like reclaimed wood, bamboo, or recycled metal. Composite materials are also a great sustainable choice, as they give new life to recycled plastics and wood fibers. Our Cap Composite Fencing, for example, uses sustainably sourced materials to create a durable and beautiful product. By choosing an eco-friendly border, you can create a garden that’s not only beautiful but also reflects your commitment to sustainability.
What to Look For in Sustainable Products
When you're ready to choose a sustainable border, look beyond just the initial appeal. Check the product details for phrases like "made from recycled materials" or "sustainably sourced." True sustainability also means longevity—a product that you won’t have to replace in a few years is better for the planet and your wallet. This is where materials like composite shine. They often give a second life to things like recycled plastics and wood fibers, creating a durable border that resists rot and decay. By focusing on both the material's origin and its durability, you can find a product that truly supports a sustainable lifestyle.
Budget-Friendly and DIY Garden Border Ideas
Creating a stunning garden doesn’t have to come with a hefty price tag. Some of the most beautiful and effective garden borders are born from a little creativity and a willingness to get your hands dirty. If you’re working with a tight budget or just love the satisfaction of a good DIY project, there are plenty of ways to define your garden beds without breaking the bank. From using the earth itself to repurposing natural materials found right in your yard, you can achieve a polished look for a fraction of the cost. Let’s explore some simple, affordable ideas that will give your garden the beautiful frame it deserves.
Create a Natural Edge with Trenching
One of the most cost-effective ways to define your garden is to create a natural edge using a simple trench. This technique, often called a Victorian trench, involves digging a shallow, V-shaped channel between your garden bed and your lawn. It creates a crisp, clean line that effectively stops grass from creeping into your flowerbeds. All you need is a sharp spade or a half-moon edger and a bit of effort. The result is a subtle, minimalist border that allows your plants to be the main attraction. It’s a completely free solution that offers a surprisingly professional finish and makes mowing along the edge much easier.
Use Natural and Found Materials
Look no further than your own backyard for beautiful and free border materials. Using natural elements like stones, rocks, or fallen branches is a wonderful way to create a border that feels like a seamless part of the landscape. This approach is not only budget-friendly but also sustainable, as you’re repurposing materials that are already on your property. These organic borders add texture, character, and a rustic charm that you can’t always get from store-bought options. It’s a perfect weekend project that connects you with your garden in a hands-on, creative way.
Stacked Rocks and Boulders
If your property has an abundance of rocks, you have the makings of a beautiful and durable garden border. Stacking rocks or arranging small boulders along the edge of your garden bed creates a rustic, natural-looking wall that helps with soil retention and drainage. You can arrange them loosely for a casual feel or fit them together more tightly for a structured look. As experts at The Spruce point out, this is a fantastic DIY project that saves money while adding a timeless, earthy element to your landscape design.
Logs and Railroad Ties
For a charming, woodland-inspired border, consider using logs, thick branches, or reclaimed railroad ties. Laying logs end-to-end creates a simple, rustic edge that works perfectly for informal cottage or country gardens. You can often find fallen branches or logs for free after a storm or from local tree-trimming services. While traditional railroad ties offer a sturdy, classic look, be mindful that older ones may be treated with creosote, so it's best to use them for ornamental beds rather than edible gardens. Untreated landscape timbers are a great alternative for a similar effect.
Affordable Store-Bought Options
If you don’t have natural materials readily available, or if you prefer a more uniform look, there are still plenty of budget-friendly options at your local garden center. You don’t need to invest in expensive custom edging to get a clean, defined border. Simple, classic materials like bricks, pavers, or recycled rubber can provide a durable and attractive edge without a significant financial investment. These materials are often easy to install yourself, making them great choices for a quick and satisfying weekend project that will instantly improve your garden’s appearance.
Curved Bricks and Pavers
Bricks are a classic and versatile choice for garden edging that never goes out of style. They are relatively inexpensive and can be laid in various patterns to suit your aesthetic—set them flat for a subtle edge, on their side for a bit more height, or at an angle for a decorative sawtooth pattern. One of the best things about using bricks is their flexibility. It’s often easier to lay them in gentle curves than in a perfectly straight line, allowing you to create soft, flowing garden beds that add visual interest and a custom feel to your landscape.
Recycled Rubber Edging
For a practical and incredibly easy-to-install option, look no further than recycled rubber edging. This affordable material is flexible, making it perfect for creating smooth curves around garden beds and trees. It’s durable, lightweight, and often comes in long rolls that you can simply unroll and secure with stakes. Recycled rubber edging is especially effective at containing loose materials like mulch, gravel, or wood chips, keeping your pathways and garden beds neat and tidy. It’s a low-maintenance solution that provides a clean, functional border with minimal effort.
Choosing Your Ideal Garden Fence Border
With so many options out there, picking the right border can feel like a big decision. But it doesn't have to be overwhelming! The perfect border is one that not only looks great but also works for your specific garden, climate, and budget. Think of it as the frame for your masterpiece—it should protect and highlight what’s inside. By considering a few key factors, you can confidently select a border that you'll love for years to come. Let's walk through what you need to think about to find the perfect match for your outdoor space.
Find a Style That Fits Your Home
Your garden border should feel like a natural extension of your home and garden's style. A formal English garden might call for a classic, low-profile metal fence, while a rustic cottage garden could be complemented by a charming picket fence or a natural stone edge. Deciding between a fence or a living border like a hedge will depend on the look you want to achieve. Take a walk around your yard and notice the existing materials and colors. The goal is to choose a border that ties everything together, creating a cohesive and intentional garden design.
Exploring Decorative Styles
Once you have a general theme, you can get into the fun details of decorative styles. For that classic, cottage-inspired garden, a low picket fence or a border with a soft, scalloped edge feels instantly welcoming. If your home has a more modern vibe, you might lean towards the clean, straight lines of metal or composite edging, which create a sleek and organized look. Don't be afraid to mix materials for a custom feel—think about pairing a smooth composite border with a textured stone pathway. The goal is to pick a style that not only frames your plants but also adds another layer of personality to your yard. Versatile materials like our composite landscape edging make it easy to create the exact lines and curves your design needs.
How Tall Should Your Border Be?
The size of your border should be proportional to your garden. A tall, bulky border can easily overwhelm a small flower bed, while a short, delicate one might get lost next to a large vegetable patch. Think about the mature height of your plants, too. You want a border that contains them without blocking sunlight or your view. It's also crucial to account for your yard's specific layout, including any slopes or elevation changes. Getting the scale right ensures your border looks balanced and functions effectively without creating unintended issues down the road.
Understanding Common Sizes
As you browse different options, you'll find that garden borders typically come in a few standard heights, each designed for a specific job. Low borders, usually under a foot tall, are fantastic for creating a clean edge around flower beds and keeping mulch in its place without blocking the view of your beautiful blooms. If you need a bit more protection, a border around 24 inches high can be enough to deter small animals like rabbits from turning your vegetable patch into their personal buffet. For more determined critters or larger pets, a taller animal barrier, sometimes up to four feet, creates a much more effective boundary. Ultimately, the right height depends entirely on your goal—are you aiming for pure aesthetics, simple containment, or serious protection?
Choose a Border That Will Last
You want a garden border that can stand up to the elements without constant upkeep. Materials like wood look beautiful but can rot, warp, or attract pests over time. Metal can be sturdy, but some types may rust. This is where composite materials really shine. Frame It All boards and brackets are designed to create long-lasting landscape edging that won't break down. Because they resist rot and weather damage, you can set them up and enjoy a crisp, clean garden edge for seasons to come with minimal maintenance.
Select Materials for Your Climate
Your local weather plays a huge role in how well a border material will perform. If you live in an area with harsh winters, you’ll need a border that can withstand freeze-thaw cycles without cracking. In hot, sunny regions, you'll want a material that resists fading and warping from UV exposure. Composite and vinyl are excellent all-weather choices. Also, think about how your border can work with your climate. A border that allows climbing plants to weave through can provide shade and create a cooler microclimate for your garden beds.
How to Budget for Your Project
Garden border costs can vary widely, so it’s smart to set a budget before you start shopping. The total cost will depend on the material you choose and the size of your garden. Remember to factor in any potential installation costs if you’re not planning to do it yourself. Luckily, there are fantastic options for every price point. Many modern borders, including some no-dig varieties, are designed for easy DIY installation, which can save you a significant amount of money. Planning ahead helps you find a solution that meets your financial and gardening goals.
Understanding Potential Costs
The price of a garden border can swing dramatically, with single panels ranging anywhere from $50 to over $500 depending on the material and design intricacy. A simple plastic edge will cost far less than an ornate wrought iron fence. The good news is that with thousands of options available online, you can find a solution that fits your budget. Don’t forget to account for installation, which can be a significant hidden cost if you hire a professional. To keep your project affordable, consider a DIY-friendly system. Many modern options, like our snap-lock landscape edging, are designed for easy, tool-free assembly, allowing you to achieve a professional look without the labor costs.
Getting Your Measurements Right
Before you buy anything, grab a tape measure and get the exact dimensions of the area you want to enclose. Measure the total length of the perimeter, and be sure to note any curves or corners. Forgetting this step is a common mistake that can lead to buying too much or too little material. It’s also a good idea to sketch out your garden space and mark the measurements. This simple plan will be your best friend when you’re ready to purchase your materials and start the installation, ensuring a smooth and successful project.
Planning Your New Garden Border from Scratch
Starting a new garden border is an exciting project, but a little forethought goes a long way. Taking the time to plan ensures your border will be a beautiful, thriving part of your landscape for years to come, not a source of frustration. The key is to break it down into manageable steps, from choosing the right time to start to preparing the ground properly. A solid plan is the foundation of any great garden, and it saves you time, money, and effort in the long run. Let’s walk through how to get your new border started on the right foot, creating a space you’ll be proud of.
When to Plan, Prepare, and Plant
Timing is everything in the garden. The best time to dream up and design your new border is during the quieter seasons, like late summer or winter. This gives you plenty of time to think about the shape, size, and style you want without the pressure of the planting season. Once you have a plan, you can focus on preparing the ground. The ideal times to get your hands dirty and prepare the soil are also in late summer or early winter. This allows the soil to settle before you introduce new plants. When it comes to planting, aim for autumn or spring. The cooler temperatures and reliable moisture during these seasons help plants establish strong roots before the stress of summer heat or winter cold sets in, giving them the best possible start.
Marking and Preparing the Ground
Once you have a vision, it’s time to bring it to life. Start by outlining the shape of your new border right on the ground. A garden hose or a long piece of string is perfect for this—you can easily adjust it to create smooth curves or straight lines until you’re happy with the design. After you’ve marked your territory, the real work begins. Clear the area of any existing grass, weeds, large stones, or debris. Then, use a spade or garden fork to dig over the soil, breaking up any compacted clumps until it’s loose and crumbly. This process, sometimes called double digging, aerates the soil and makes it easier for plant roots to grow. A well-prepared bed is the secret to a healthy, stable border.
Developing a Smart Planting Strategy
With your border prepped and ready, the fun part begins: arranging your plants. Before you start digging, place your plants, still in their pots, around the border. This allows you to visualize the final look and make adjustments easily. Think about how big each plant will get at maturity to ensure they have enough space to grow without overcrowding. A common design trick is to place taller plants at the back and shorter ones at the front. Consider color combinations and when each plant will bloom to create a display that offers visual interest throughout the seasons. Once you’re satisfied with the layout, you can start planting, working from the back of the border to the front to avoid stepping on your newly planted additions.
DIY vs. Hiring a Pro: What's Right for You?
Deciding whether to install your garden border yourself or hire a professional comes down to three things: your time, your budget, and your comfort level with the project. A DIY installation can be incredibly rewarding and save you money, especially with user-friendly systems. It gives you complete control over the process and the satisfaction of seeing your vision come to life with your own hands. Many modern border kits are designed for easy assembly, turning a weekend project into a long-lasting feature of your garden.
On the other hand, hiring a professional brings expertise and efficiency. If your project involves tricky slopes, complex designs, or you’re simply short on time, a pro can handle the job quickly and correctly. They have the specialized tools and experience to foresee potential issues, like dealing with tough soil or navigating underground utilities. Think about the scale of your project. A simple border around a flower bed is a great DIY task, but a large, property-defining fence might be better left to an experienced installer. There’s no wrong answer—it’s all about choosing the path that best fits your specific situation and helps you achieve your dream garden with the least amount of stress.
Prepping Your Garden for Installation
Before you can lay down any border, you need a clean slate. Start by clearing the designated area of all grass, weeds, and large rocks. Your goal is to create a smooth, level surface for the border to sit on. Use a spade or garden hoe to scrape away the top layer of sod. For a really crisp line, you can lay a garden hose or rope on the ground to outline the shape of your border first, then use a flat-edged spade to cut along it.
One of the most common DIY mistakes is misjudging yard elevation changes, which can result in a wobbly, uneven border. Use a level to check your work as you go. If you’re working on a slope, you may need to create a small trench and use a step-down method to keep the border level. This initial prep work is the foundation of your entire project, so taking your time here will pay off with a professional-looking finish.
What You'll Need to Get Started
There’s nothing more frustrating than starting a project only to realize you’re missing a crucial tool. Before you begin, gather everything you’ll need in one place. For most garden border installations, your toolkit will be pretty simple: a sturdy pair of gloves, a shovel or spade, a rubber mallet, a measuring tape, and a level.
Having all your materials ready is just as important. If you’re using a kit, unpack it and make sure all the pieces are there. Frame It All’s garden builder kits come with everything you need, so you can skip the guesswork. If you’re sourcing materials yourself, double-check your measurements to ensure you have enough boards, stakes, and connectors to complete the job. A little organization upfront makes the entire installation process smoother and more enjoyable.
A Step-by-Step DIY Installation Guide
With your ground prepped and your tools ready, the installation can begin. If you're using a snap-lock system, this part is surprisingly fast. Start by laying out the first board and inserting the stakes into the designated holes. Use a rubber mallet to gently tap the stake into the ground until it’s secure. Then, simply connect the next board and repeat the process. The snap-lock mechanism ensures a strong, stable connection without any complicated hardware.
As you work your way along the border, use your level frequently to check that the boards are straight. This is especially important for the first few pieces, as they will guide the rest of the installation. Once your border is fully assembled, you can backfill it with soil. For a polished look, consider adding a layer of mulch inside the border. You can also get creative by layering plantings for more visual interest, with taller plants in the back and shorter ones in the front.
When to Call a Professional
Sometimes, calling in a professional is the smartest move. If your project is large-scale, like installing a full privacy fence, or if your property has significant slopes or drainage issues, an expert can save you time and prevent costly mistakes. A pro will have the heavy-duty equipment needed for digging post holes in rocky soil and the knowledge to ensure everything is up to local code.
You should also consider a professional if you are unsure about your property lines. A surveyor or an experienced fence installer can help you avoid any disputes with neighbors down the road. Ultimately, if the thought of the project feels overwhelming or you don’t have the time to dedicate to it, hiring a contractor is a great way to get the beautiful, durable result you want. For larger projects like Cap Composite fencing, professional installation can ensure your 30-year warranty is protected.
Common DIY Mistakes to Avoid
A few common slip-ups can turn a simple project into a headache. One of the biggest is setting the border too shallow. Your edging needs to be deep enough to prevent grass and weeds from creeping underneath and to remain stable through changing seasons. Another frequent error is ignoring potential weed growth. Before you install your border, lay down a layer of landscape fabric to create a barrier that will save you from constant weeding later.
Be mindful of what’s already in your garden. Avoid cutting into the major roots of nearby trees and shrubs, as this can damage or even kill the plant. Finally, don’t forget that what’s underground matters. Hitting a utility line is dangerous and can lead to expensive repairs, which is why it’s so important to call before you dig.
Simple Safety Tips for DIYers
Safety should always be your top priority during any DIY project. Before you break ground, make the free call to 811. This service will contact your local utility companies to mark the approximate location of any underground lines, like gas, electric, and water. It’s a simple step that prevents serious accidents.
Always wear the right gear for the job. A good pair of gardening gloves will protect your hands from blisters and cuts, while closed-toe shoes will keep your feet safe from stray tools or heavy materials. When using a mallet or other tools, be aware of your surroundings. Taking these basic precautions ensures your project is not only successful but also safe from start to finish.
How to Maintain Your Garden Border
Once you’ve installed your beautiful new garden border, the work isn’t over—but the good news is, maintenance is pretty straightforward. A little attention throughout the year will keep your border sturdy, your garden healthy, and your yard looking sharp. Think of it less as a chore and more as part of the gardening process. A well-maintained border not only looks better but also does its job more effectively, protecting your plants and soil from the outside world.
The key is to build a few simple tasks into your regular gardening routine. From seasonal check-ups to consistent weeding, these small steps prevent bigger problems down the road. Whether you have a classic picket fence or modern composite edging, keeping it in top shape ensures it will last for years. A strong, clean border frames your garden perfectly, making your plants the true stars of the show. Let’s walk through a simple care plan to keep everything looking its best.
Your Seasonal Maintenance Checklist
A quick check-in each season is the easiest way to stay on top of maintenance. In the spring, clear away any leaves or debris that piled up over the winter and inspect for any damage from frost or snow. Summer is all about managing plant growth and keeping the area tidy. As fall arrives, trim back perennials and give the border a good cleaning before winter sets in. This simple cycle prevents small issues from becoming big headaches and keeps your garden looking intentional and cared for all year long.
How to Stop Weeds Around Your Border
Weeds are more than just an eyesore; they compete with your beloved plants for water, sunlight, and nutrients. Ignoring them can quickly lead to an overgrown border where your flowers and veggies struggle to thrive. Make it a habit to pull weeds as soon as you spot them. For a more proactive approach, apply a thick layer of mulch around your plants. Mulch helps suppress weed growth, retains soil moisture, and gives your garden bed a clean, finished look. A few minutes of weeding each week is far easier than tackling a jungle later.
Quick Cleaning and Repair Tips
Give your border a quick inspection every few months, especially after heavy rain or wind. Look for loose sections, wobbly posts, or any signs of damage. For wood borders, check for rot or pests. If you have a modular system, ensure all connections are secure. Most issues are minor and easy to fix if you catch them early. A simple cleaning with a brush or a gentle spray from the hose can also make a huge difference. Starting with durable, low-maintenance landscape edging will save you a lot of time on repairs in the long run.
Protecting Soil Health at the Border
The soil inside your border is the foundation of a great garden. Healthy soil grows healthy plants, which in turn makes your entire garden border look lush and vibrant. Each spring, it’s a good idea to amend your soil by mixing in a fresh layer of compost or other organic matter. This replenishes nutrients that were used up during the last growing season. Good soil structure also helps with drainage, preventing water from pooling against your border material, which can extend its life.
Let Your Plants and Border Work Together
Your border and your plants should work together as a cohesive design. Think about how your plants will grow and interact with the border over time. Avoid planting aggressive spreaders right up against the edge, as they can put pressure on it. Instead, use layering—place taller plants toward the back and shorter, mounding plants in the front. This creates a beautiful, full look that complements the frame you’ve created. For an all-in-one solution, animal barrier gardens combine the border and plant protection into a single, functional design.
Watering New Border Plants Effectively
Your new plants are working hard to establish their roots and settle into their new home. During this critical first growing season, consistent watering is their best friend. The key is to water deeply and thoroughly, rather than giving them a light sprinkle every day. This encourages the roots to grow down into the soil in search of moisture, creating a stronger, more resilient plant. For most perennials and smaller plants, you’ll need to keep an eye on them for their first season. For larger shrubs and trees, this establishment period can take two or three years. A good border helps by keeping that precious water and mulch contained right where the roots need it most.
Editing and Evolving Your Border Over Time
A garden is a living, breathing space, and it will naturally change over time. Some plants will thrive and spread, while others might not perform as well as you hoped. Don’t be discouraged—this is all part of the process! A great tip is to take photos of your border when it’s at its peak. These pictures serve as a helpful reference later when you’re planning changes, reminding you of that one plant that got a little too big or the empty spot you’d like to fill. This evolution is where modular systems, like Frame It All’s garden builder kits, are incredibly useful. If a section of your garden needs more room, you can easily expand or reconfigure the border to accommodate its growth.
Make Your Investment Last
The best way to ensure your garden border lasts is to start with a quality product and a solid installation. When you build your border, make sure your posts are set correctly and the structure is level and secure. This prevents leaning and instability later on. Choosing a material that resists rot, fading, and pests is also a smart move. Products like Cap Composite fencing are designed to withstand the elements for decades with minimal upkeep, giving you a beautiful border you won’t have to worry about replacing.
Creative Ways to Customize Your Border
Once your garden border is installed, the real fun begins. Think of your fence not just as a boundary, but as a frame for your garden masterpiece. This is your chance to inject your personality and style into your outdoor space, turning a functional element into a beautiful focal point. A few simple additions can transform your border from standard to stunning, making your garden uniquely yours. Whether you love a clean, modern look or a whimsical, cottage-garden feel, there are countless ways to customize your border. Let’s explore some creative ideas to help you get started.
Small Details, Big Impact
Adding small, thoughtful details is an easy way to personalize your garden border. You can hang decorative items like small metal art, ceramic bells, or even vintage garden tools for a rustic touch. For a softer look, try weaving colorful outdoor ribbons or rope through the pickets or mesh. Attaching small hanging baskets with trailing flowers adds a pop of color and dimension. Even something as simple as adding decorative post caps can give your fence a more finished and polished appearance. The key is to choose accents that reflect your personal style and complement the overall theme of your garden.
Create Evening Ambiance with Lighting
Don't let your garden's beauty fade when the sun goes down. Integrating lighting along your border can create a magical atmosphere and extend the hours you can enjoy your outdoor space. Solar-powered stake lights are an incredibly easy and affordable option—just place them along the fence line for a gentle glow. You can also drape string lights along the top of the fence for a festive, café-like feel. For a more dramatic effect, consider using small spotlights to uplight interesting plants or features along the border. This not only enhances safety but also adds a layer of sophisticated charm to your evenings.
Choosing Companion Plants for Your Border
The plants you choose to grow along your border are just as important as the fence itself. The right plantings can soften the lines of the fence and create a lush, cohesive look. For a classic, formal feel, a low hedge of boxwood is timeless. If you prefer a more romantic, cottage-garden style, try planting climbing roses or clematis to weave through the fence. Low-growing, mounding plants like sweet alyssum or creeping phlox can spill over the edge of the border, creating a beautiful, cascading effect. Think about how different plant textures and colors will play against your fence material.
Use Paint and Stain to Match Your Style
Your garden border is a key design element, so its color and material should work in harmony with the rest of your outdoor space. Consider the color of your home's exterior, your patio furniture, and even the blooms in your garden. A crisp white picket fence offers a classic look that makes flower colors pop, while a black metal fence provides a sleek, modern backdrop. Natural wood tones create a rustic, earthy feel. Frame It All’s composite fencing offers the look of wood without the maintenance, and it comes in colors that won’t fade, ensuring your design stays true for years.
More Than a Border: Adding Function
Your garden border can do more than just define a space. With a little creativity, it can serve multiple purposes, which is especially useful in smaller yards. Look for fencing that incorporates a trellis, giving climbing plants and vegetables a place to grow vertically. Some border designs feature a wider top rail that can double as a narrow shelf for small potted plants or a convenient spot to rest your drink. You can even find raised garden beds with built-in fencing, which protect your plants from pests while creating a neat, contained growing area.
Creating a Secluded Garden Nook
Even a small border fence can help create a sense of seclusion and turn your garden into a private retreat. While a low fence won’t block your neighbor’s view entirely, it creates a psychological boundary that makes a space feel more intimate and enclosed. For more effective screening, you can use a slightly taller border and plant dense shrubs or tall ornamental grasses behind it. This layering technique creates a living wall that adds beauty while enhancing your backyard privacy. This helps you define different "rooms" in your yard, like a cozy seating area or a quiet reading nook.
Common Garden Border Questions Answered
When you're planning a garden border, a few questions always seem to pop up. From budget to installation, getting clear answers can help you make the best choice for your yard. Let's tackle some of the most common questions we hear from fellow gardeners to help you get started on the right foot.
What is the cheapest material for garden edging?
If your main goal is to find the most affordable option, plastic or rubber edging is typically the cheapest choice you can find at a garden center. These materials can create a simple barrier between your lawn and garden bed for a very low upfront cost. However, it's important to think about long-term value. These less expensive options often don't stand up well to weather, becoming brittle from sun exposure or cracking during freezes. This means you might find yourself replacing them every few seasons, which adds up over time. For a budget-friendly and sustainable approach, you could also consider creating a natural edge by trenching or using found stones from your property.
What is the best border for holding in mulch?
To keep mulch neatly contained in your garden beds, you need a solid, continuous barrier. Wood and metal edging are both effective choices for this job. Wood provides a classic, natural look and does a great job holding everything in, but it can be prone to rot and decay over time, especially in damp climates. Metal offers a crisp, clean line and is very durable, though some types can rust. For a solution that gives you the best of both worlds, consider composite landscape edging. It creates a sturdy wall to hold back soil and mulch, but unlike wood, it won’t rot, warp, or splinter, ensuring your garden looks tidy for years with no replacement needed.
What is the easiest garden border to install?
Hands down, the easiest garden borders to install are "no-dig" options. These clever designs skip the back-breaking work of digging a deep trench and instead use stakes that you simply hammer into the ground to hold the border in place. This makes installation a quick and satisfying weekend project for any DIYer. Our Frame It All systems are built on this principle. The boards connect with snap-lock brackets, and the anchor stakes secure the entire structure firmly in the ground. You don’t need a lot of tools or experience to create a professional-looking border with our garden builder kits in just an afternoon.
Related Articles
- Border Fencing for Gardens: A Comprehensive Guide
- Benefits of a Privacy Fence for Gardens
- 5 Vegetable Backyard Garden Fence Ideas
- Do You Need Fencing Around Raised Garden Beds?
Frequently Asked Questions
What's the easiest type of border for a beginner to install? If you're new to DIY projects, look for a no-dig or modular system. These often use stakes that you drive into the ground and boards that connect easily, sometimes with a simple snap-lock mechanism. This approach saves you from the heavy work of digging a deep trench and ensures you can create clean lines and curves without much hassle. A kit that includes all the necessary boards, stakes, and connectors is your best bet for a smooth weekend project.
How deep does my garden border need to be? A good rule of thumb is to bury at least a few inches of your border material into the ground. This depth is crucial for two reasons: it provides stability so the border won't lean or shift over time, and it creates an effective barrier to stop grass roots from creeping into your garden beds. If your border is too shallow, you'll find yourself constantly fighting back the lawn.
Will a low garden border really stop pests like rabbits? A low border acts more as a deterrent than a fortress. For many small critters, the simple physical obstacle is enough to make them reconsider your garden as an easy snack bar and move on. However, if you have particularly determined rabbits or larger animals, you may want to consider a taller solution, like a raised garden bed that includes a higher fence specifically designed to protect your plants.
How do I choose a border that will last in a wet or very sunny climate? The key is to select a material that's built to handle the elements. While traditional wood is beautiful, it can rot in damp conditions and warp or fade under intense sun. Materials like composite or vinyl are excellent choices for tough climates because they are engineered to resist moisture and UV damage. They give you the look you want without the constant maintenance or worry of them breaking down after a few seasons.
What's the best way to handle a border on a sloped or uneven yard? Installing a border on a slope requires a step-down technique. Instead of trying to run a single, angled line, you create a series of short, level sections that follow the contour of the hill. Each section is slightly lower than the one before it, creating a terraced effect. This method ensures your border looks professional and remains stable, preventing soil erosion on the incline.